Saturday, April 27, 2013

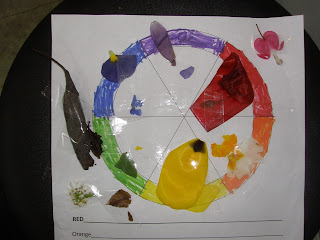
It was 70º today! I figured it would be child abuse to keep the kids inside… to say nothing of art teacher abuse!!  We went outside and did a Color Wheel Treasure Hunt.  I printed out a simple circle divided into six sections.  We started class by coloring in the wheel and talking about primary and secondary colors.  We talked about “neutrals” and where they belonged on the color wheel.  We added the neutral colors to the area below our color wheels.

We took tape, scissors and our color wheels into my garden and found leaves, flowers, sticks, rocks, and anything else that wasn't “man-made" and added it to the appropriate places on the color wheel.

When we got back to the studio we looked at what we had gathered and noticed most of our specimens were on red and green.  Orange was really hard to find and so was blue.  Old dead leaves were good for grey, so were rocks. 

Everyone got to take their pictures home.  


...and... we took some time out to play Simon Says and Freeze Tag...  Hint... the art teacher never has to be it.   (She can't catch anyone).


Sunday, April 21, 2013

Negative Space

The lesson this week was so much fun!  Students made collages using a small colored square and a larger white background.  The concept was negative space and how important it is to a design.  The results were amazing.  I even did this lesson myself... a couple of times.


Friday, April 12, 2013

Op Art and internal contour lesson

This week we talked about the way lines can make flat things seem like they have shape.  This is sometimes called “internal contour”.  We started by drawing a square with a circle in the middle of it.  We made a checkerboard in the square being careful not to draw the lines though our circle.  We filled in the circle by making a cross.  Then we added curved lines going both ways.  This made the circle look like a ball.  We filled in our designs with markers.  When finished it seemed like the ball was “popping out of the picture”.   Loved the results!!  They all did a great job.


Monday, April 8, 2013

Katie's trip to Mexico

I'm so proud of her!
 
Chloe, age 12

 
Judith, age 12


Suzette, age 13
 
Olivia, age 5
 
Avery, age 8
 
 
Emma, age 12


Drawing Goblets

Brown paper, vine charcoal and white china markers were used today to create the “illusion” of glass.  They are called “china” markers because they are used to write on china dishes and glass… not because they come from China.   With the charcoal we sketched the basic shapes of a glass goblet by drawing a sphere for the bowl, a cylinder for the stem and a cone for the base.  We blended the charcoal by rubbing it with our fingers.  We studied the goblet to see how the light reflected off of the glass.  Depending on where you were sitting you could see the window, the door and the lights overhead reflected in the glass.  We used white china markers, also called grease pencils, to make the bright white marks.  The results are wonderful!

 
Welcome to Kids Art Poulsbo.  I’m Barb Schultz and I teach kids art classes from a studio in my home.  I’m located between Silverdale and Poulsbo just off Highway 308. 
   
I love spending time with kids.  Their excitement and curiosity are energizing.  Helping them develop the skills to express their ideas is like letting the genie out of the bottle… get them started and just stand back.  Their accomplishments are amazing!  Please visit my website www.enchantedvalleyarts.com for information about signing up for classes.
\